Cakewalk // Documentation // SONAR X2 // Step recording
Table of Contents Previous Next Index

Recording ► Step recording

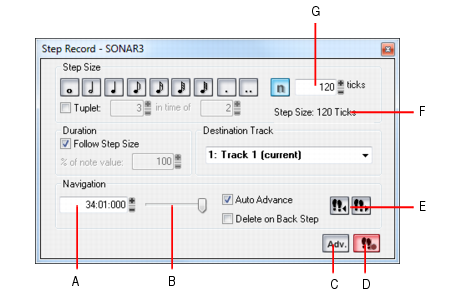
Step recording is a method of recording MIDI notes one note or chord at a time. It’s a very easy and precise way to record, but can sound mechanical if used in the wrong situation. You use step recording in its typical form by choosing a step size, such as a quarter note, and then playing a note on your MIDI keyboard. When you play the note, SONAR records the note, and moves the insertion point forward by the distance of the step size (moving the insertion point every time you press a note is the default behavior). You can then record more notes of the same duration by playing notes on your keyboard, or you can change the step size while you’re recording and record different size notes. You can also choose how long the notes you play will sound, as a percentage of the step size. For example, even though you record some notes that have a step size of a quarter note, if you set the Duration field to 50%, the notes will be recorded and displayed as a series of eighth notes, each followed by an eighth rest. The insertion point for each recorded note in this example moves by a quarter note (the step size) each time you record a note. If the duration is longer than the step size, the notes will overlap with the notes recorded at the next step.
Note: SONAR doesn't respond to sync signals while the Step Record dialog box is open and enabled.
list-image
Add two step sizes together by pressing the + key between each step size selectionDelete as many step-recorded notes as you want, while moving the insertion point back through the steps you delete
list-image
Create a custom step size lasting any number of ticks (ticks are divisions of a beat—SONAR uses 960 by default); SONAR will remember the custom step size until you change it
Tip: By using keyboard shortcuts, you can leave your left hand on your MIDI keyboard to enter notes with, and control most step recording functions with your right hand on the NumPad.
MIDI data is recorded using step record even if the track is not armed. Loop markers are ignored. And step recording always uses the Sound on Sound (blend) record mode, regardless of the current record mode.
With Auto Advance disabled, you must click Advance each time you want to advance to the next step. While this requires more effort, it also provides you with more flexibility. For example, with Auto Advance disabled, you do not even need to play the notes at a single step at the same time! You can play any number of notes one at a time, and they will all be recorded at the same step until you click the Advance button. You can even record notes of different durations at the same step—simply record the notes of one duration, change the duration, and play more notes, without clicking Advance.
The Step Record dialog box has two modes: Basic (smaller with fewer options), and Advanced (larger, more options). To use Basic mode, click the Bas./Adv. button so that the Adv. button is displayed. To use Advanced mode, click the Bas./Adv. button so that the Bas. button is displayed.
A. Insertion point location B. Position slider C. Basic/Advanced button D. Step Record Toggle button to enable/disable step recording E. Click to move insertion point by step size F. Total step size display G. Custom tick size field
A. Randomize durations field B. Step pattern recording field C. Click to move insertion point by single beat D. Click to move insertion point by single measure
1.
Click the Record button and keep the button pressed for a bried moment until the pop-up menu appears, then choose Step Record. The Record button changes to .
2.
3.
Make sure that the Basic mode of the Step Record dialog box is displayed (the Adv. button will be showing if the Basic mode is displayed; if the Bas. button is showing, click it).
list-image
Click the Step Advance button to move the insertion point forward by the current step size, or click the Step Backwards button to move the insertion point backward by the current step size. SONAR displays the insertion point location in the Insertion point location field (see Basic mode picture above).
list-image
For common step sizes, click one of the notehead icons to choose a step size as large as a whole note or as small as a 64th note . You can increase the step size you choose by 50% or 75% by clicking the dot icon , or double-dot icon , respectively. You can add different step sizes together by holding down the CTRL key while you click extra icons, or by pressing the + key on the NumPad.
list-image
For a tuplet step size, click a notehead icon to choose the “tuplet unit” (for example, for eighth-note triplets, choose an eighth note). Then enable the Tuplet check box and fill in the “n” in time of “n” fields. For example, if you want quarter-note triplets, click the quarter-note icon , enable the Tuplet check box, and fill in 3 in the time of 2, which means 3 quarter notes in the time of 2 quarter notes. If you want eighth-note triplets, click the eighth-note icon , enable the Tuplet check box, and fill in 3 in the time of 2. If you wanted 5 notes in one beat, click the quarter-note icon, enable the Tuplet check box, and fill in 5 in the time of 1.
list-image
If you want to create a custom step size, click the n button , and fill in the number of ticks in the Ticks field.
list-image
If you want duration and step size to be different, disable the Follow Step Size check box and fill in a percentage value in the % of Note Value field.
9.
Play a note or chord on your MIDI controller. When you release the note(s), the insertion point moves by the step size, if the Auto Advance check box is enabled. If Auto Advance is not enabled, you can release the notes and record more notes, or you can use the Navigation controls to advance the insertion point. If you are still holding down a note or notes when you advance the insertion point, the step size of the held notes is extended by the current step size.
10.
Continue recording notes of the same step size and duration to the same track, or change any of those parameters and continue recording. To create a rest, advance the insertion point without playing any notes. To delete notes on previous steps, you can press CTRL+Z for each recorded step. If you want to delete previous steps and move the insertion point back at the same time, check the Delete on Back Step check box, and click the Step Backward button.
11.
When you’re finished recording, close the dialog by clicking the X icon in the upper right corner, or by pressing SHIFT+R.
Note: Options that you choose in Advanced mode, such as Link to Now Time, are still in force when you use Basic mode.
The procedure for Advanced step recording is the same as for Basic, but with these extra options, which become available when you click the Bas./Adv. button in the Step Record dialog box so that it displays Bas.:
Table 37.  
Disable the Follow Step Size check box, enter a number into the % of Note Value field (leave it at 100 if you want to follow step size), and enter the maximum duration that the step size should be randomized in the Randomize By field.
Choose a constant pitch and/or velocity and/or MIDI channel for the recorded note(s)
To choose a constant value for pitch, velocity, or channel, disable the Use Input check box next to the desired field, and fill in the value you want to use for that particular parameter.
Enable the Link to Now Time check box.
Click the Beat Backward button or the Beat Advance button.
Click the Measure Backward button or the Measure Advance button.
A plus sign appears after the value in the Step Size “n” Ticks field.
The total step size appears in the Step Size “n” Ticks field.
The new note appears in your track, and the Now Time moves the distance of the two combined steps that you entered. To toggle the plus sign on or off in the Step Size “n” Ticks field, press the + key on the Num Pad. To clear a large value from the Step Size “n” Ticks field, click a smaller value, or use a keyboard shortcut for a smaller value.
list-image
Click the Activate Step Recording button in the Step Record dialog box so that the button is not red. This disables step recording, allowing you to use both the mouse, and any keyboard shortcuts that the Step Record dialog box uses, for other commands.
By default, opening the Step Record window will automatically enable step recording. SHIFT+R is the default shortcut to open the Step Record dialog box. Once the Step Record window is open, you can enable/disable step recording at will without closing the Step Record window: just click the Activate Step Recording button in the Step Record dialog box, or press SHIFT+R.

Copyright © 2024 Cakewalk, Inc. All rights reserved
Sitemap | Privacy Policy | Legal